Local Development Environment Configuration
Operating systems
This guide is available for macOS and Ubuntu.
To provision your system, just head here: https://github.com/sparkfabrik/sparkdock and follow the instructions.
Overview
Our local development environment is built on Docker, to achieve:
- High decoupling from host OS.
- Different service versions and configurations for each application/project.
- The ability to commit the infrastructure together with the application in the same repository.
- One-click local setup of projects for everyone in the team.
One image is worth a thousand words, so here follows a simplified depiction of our local environment model:
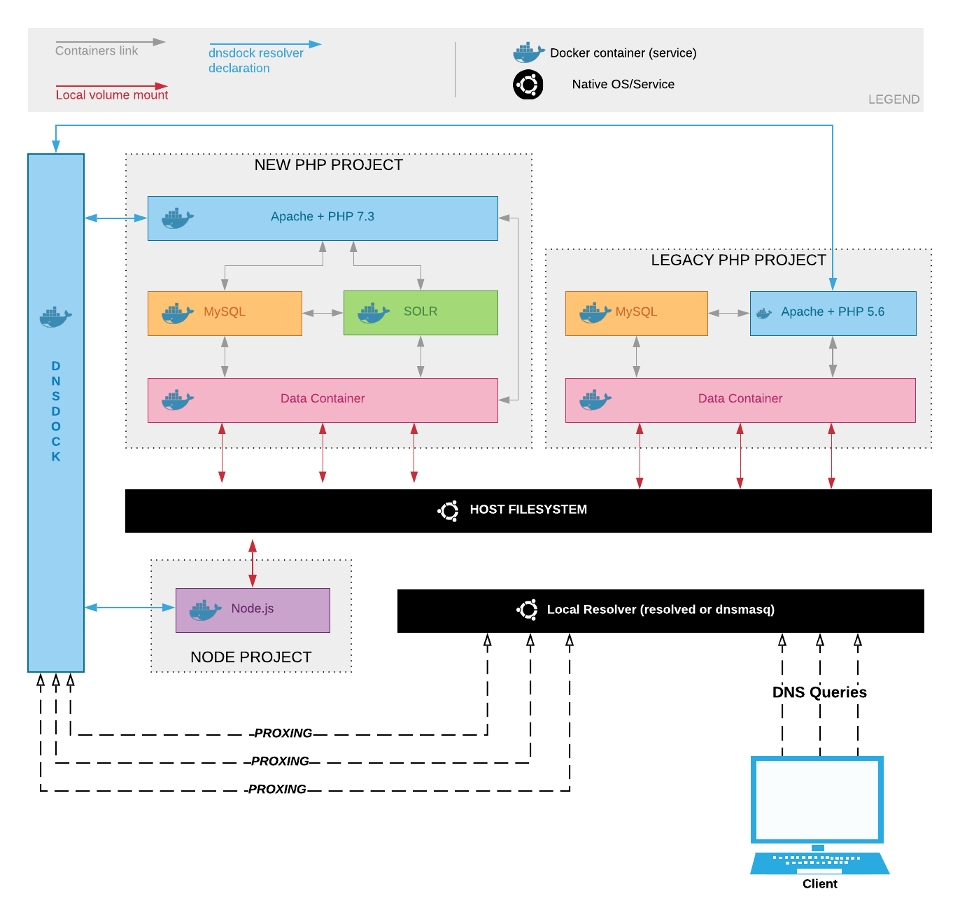
What we've got here is a set of containers, related to different projects. They are interconnected via Docker links so that each project has its service: for example, both Drupal projects in the image have dedicated MySQL and Apache/PHP containers, perfectly isolated. They can be stopped and started at will on a "by project" basis.
To keep container sets isolated we rely on docker-compose, a simple orchestrator that's easy to configure and run locally.
To reach each entry point -- which for a web application is the HTTP server that exposes the app for that project -- we need a resolver able to dynamically map containers to URLs when a container is started or stopped (mind a container IP is inherently dynamic so a static map won't do).
The last ingredient consists of a local resolver able to inform the system to proxy the calls for a given TLD (.loc in our case) to dnsdock or by using an HTTP proxy currently implemented with dinghy-http-proxy.
Why do we have dnsdock and dinghy-http-proxy
Let's start with the projects' links:
These tools are used (as alternatives) by our internal docker-compose projects and they both enable requests generated from localhost to reach running containers by querying a domain. To avoid collisions, all local projects are mapped under a "fictional" .loc top-level domain.
Important note: please remember that every .loc top-level domain is mapped by these DNS resolvers, not just sparkfabrik.loc.
So why two options? The reason is that dnsdock is a viable solution for Linux environments, where your host has direct access to Docker containers network (you can reach a Docker container on its IP address) but that's not possible on macOS or Windows/WSL. In these environments, Docker is running inside a Linux VM under the hood. Different networking layers are in place that prevent a direct connection between your host and the containers.
On macOS and Windows then, Dinghy HTTP Proxy solves the problem from a different perspective: it exposes ports 80/443 on your host, plus a UDP port to resolve DNS queries. On those ports it proxies HTTP requests to the correct containers, responding to the browser.
The following diagrams show the respective workflows.
DNSDock
To know if a container must be mapped by its resolver, DNSDock inspects a label or env variable exposed by containers, specifically:
environment:
  - DNSDOCK_ALIAS:

labels:
  com.dnsdock.alias:
The ENV variable is going to be deprecated soon, so please use the label only.
Request flow diagram
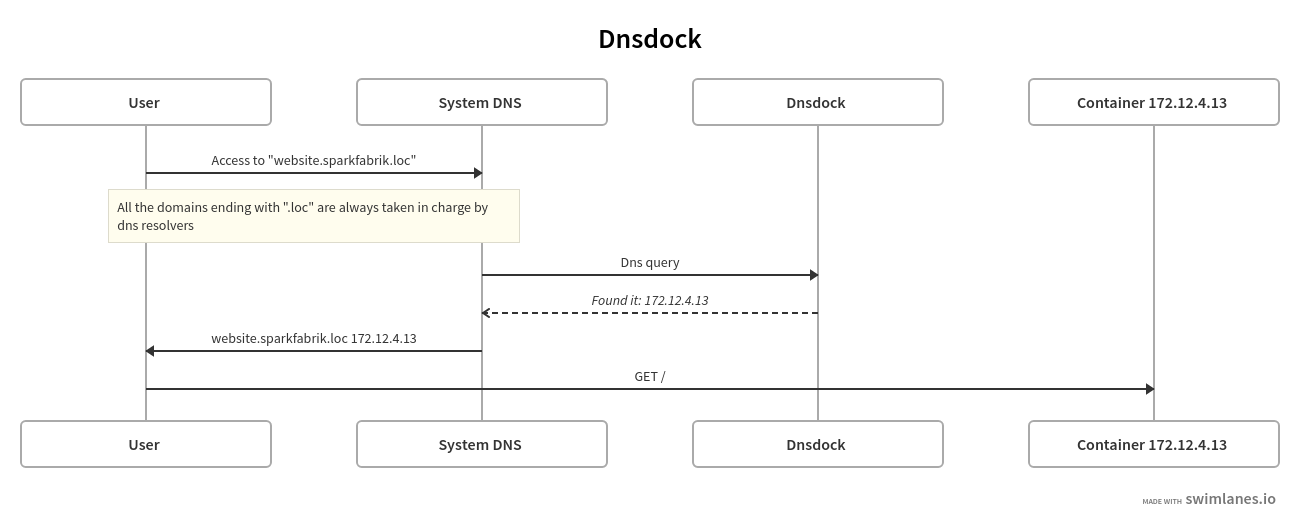
title: Dnsdock

User -> System DNS: Access to "website.sparkfabrik.loc"
note: All the domains ending with ".loc" are always taken in charge by dns resolvers
System DNS -> Dnsdock: Dns query
Dnsdock -->> System DNS: _Found it: 172.12.4.13_
System DNS -> User: website.sparkfabrik.loc 172.12.4.13
User -> Container 172.12.4.13: GET /
Dinghy HTTP proxy
To know if a container needs to be proxied, Dinghy HTTP Proxy inspects an env variable exposed by containers, specifically:
environment:
  - VIRTUAL_HOST:
Request flow diagram
title: Dinghy http proxy

User -> System DNS: Access to "website.sparkfabrik.loc"
System DNS -> Dinghy http proxy: Dns query for ".loc" domains
Dinghy http proxy -->> System DNS: _Found it: 127.0.0.1_
note: Dinghy http proxy exposes two services:
  1. DNS on port 19322:19322
  2. HTTP on ports 80:80 - 443:443
It always returns 127.0.0.1 for all domains.

User -> Dinghy http proxy: Connect to "127.0.0.1" host "website.sparkfabrik.loc"
Dinghy http proxy -> Container: GET /
Container -> Dinghy http proxy: Response
Dinghy http proxy -> User: Response
Run dnsdock or Dinghy HTTP Proxy
If you need to re-run dnsdock or dinghy-http-proxy for some reason (maybe you have deleted the containers), you can rely on sparkdock scripts:
- Linux
run-dnsdock: https://github.com/sparkfabrik/sparkdock/blob/master/config/ubuntu/bin/run-dnsdockrun-dinghy-proxy: https://github.com/sparkfabrik/sparkdock/blob/master/config/ubuntu/bin/run-dinghy-proxy- macOS
run-dinghy-proxy: https://github.com/sparkfabrik/sparkdock/blob/master/config/macos/bin/run-dinghy-proxy
If you work in SparkFabrik with the provided hardware, those scripts should already be available in your system. In case they're missing:
Ubuntu
curl -slo /usr/local/bin/run-dnsdock https://raw.githubusercontent.com/sparkfabrik/sparkdock/master/config/ubuntu/bin/run-dnsdock
curl -slo /usr/local/bin/run-dinghy-proxy https://raw.githubusercontent.com/sparkfabrik/sparkdock/master/config/ubuntu/bin/run-dinghy-proxy
chmod +x /usr/local/bin/run-dnsdock
chmod +x /usr/local/bin/run-dinghy-proxy
macOS
curl -slo /usr/local/bin/run-dinghy-proxy https://raw.githubusercontent.com/sparkfabrik/sparkdock/master/config/macosx/bin/run-dinghy-proxy
chmod +x /usr/local/bin/run-dinghy-proxyNOTE:: To build SparkFabrik projects locally, you must configure
gcloudCLI and SDK, and make sure they are authenticated with your SparkFabrik account.
Configure FireStarter Builds
To build FireStarter-based Drupal projects, a user must access specific properties and modules. To such extent, this procedure must be put in place:
- The user must be added to the
Service Group - DTU membersGitLab group (ask HR or Platform team) - The user must generate a personal access token on GitLab with
read_apiandread_repositoryscopes (Settings > Access Tokens) - The user must authenticate as described in the team's documentation (see
Packages > Firestarter CLI > Install and update > Shell setupsection) using the generated token.
Information on how to build the project is out of the scope of this guide, but these steps are a requirement for Drupal properties.
Test and enjoy
To test that everything is working as expected, we'll try to run a service in a container, exposing it through a local URL.
DNSDock
❯ docker run -d -e DNSDOCK_ALIAS=test.sparkfabrik.loc nginx:alpine

❯ curl test.sparkfabrik.loc | grep -i nginx

  % Total    % Received % Xferd  Average Speed   Time    Time     Time  Current
                                 Dload  Upload   Total   Spent    Left  Speed
100   615  100   615    0     0  36518      0 --:--:-- --:--:-- --:--:-- 55909
Welcome to nginx!
Welcome to nginx!
If you see this page, the nginx web server is successfully installed and
nginx.org.

nginx.com.
Thank you for using nginx.
Dinghy HTTP proxy
❯ docker run -d -e VIRTUAL_HOST=test.sparkfabrik.loc nginx:alpine

❯ curl test.sparkfabrik.loc | grep -i nginx

  % Total    % Received % Xferd  Average Speed   Time    Time     Time  Current
                                 Dload  Upload   Total   Spent    Left  Speed
100   615  100   615    0     0  36518      0 --:--:-- --:--:-- --:--:-- 55909
Welcome to nginx!
Welcome to nginx!
If you see this page, the nginx web server is successfully installed and
nginx.org.

nginx.com.
Thank you for using nginx.